Standard steel processes have improved so much in recent years that they are able to produce bearing steel qualities that now require better techniques to identify and classify those defects that remain.Behind the improvement in standard steel processes are long-term advances in ladle metallurgy. This has been coupled with better techniques such as ultrasonic test methods for assessing the nature of non-metallic defects in the steel. Steel producers have also made significant progress in understanding how fatigue is initiated in bearing steels. All these issues have an impact on bearing performance over the long term.
Ladle furnace technology for the production of clean steels has been in large-scale use since the 1960s. The difference in rolling bearing life achieved using ladle furnace technology compared with that of conventional two-slag practice in electric arc steel production is significant.
In steel production for bearing applications, it is well understood that bearing fatigue performance is related to the amount and type of defects, or inclusions, in the bearing steel. Inclusions act as stress raisers. They form incipient cracks, which propagate under stress reversals until a fatigue pit or spall is formed on the surface of the component.
Oxide inclusions such as alumina and silicates are strong fatigue failure initiators, while sulphides appear to have less impact in that respect. One reason for this is that oxides and carbonitrides are hard and brittle, and sulphides are soft and ductile. For bearing applications, it is important during steel-making to reduce the oxygen, which leads to the oxide inclusions, and also the titanium content, which gives rise to the titanium carbonitrides.
Continual efforts have been made to improve deoxidation processes, and this has led to gradual and significant improvements in the internal cleanliness of the steel. Contributing factors that have allowed these improvements include enhanced knowledge about deoxidation, stirring and vacuum treatment plus better and more stringent teeming procedures. The introduction of uphill teeming and effective teeming shrouds have vastly reduced reoxidation, which has contributed to the reduction of oxygen-related inclusion contents.
Cleanliness developments
Because the solubility of oxygen in solidified steel is very limited, the total oxygen content is an adequate measure of the total amount of oxygen inclusion present in steel. Of course, the morphology and the chemical composition of oxide inclusions can vary widely, depending on the processing and deoxidation. This has an impact on the finished product even if the total oxygen content remains the same. Similarly, the content of large inclusions caused by contamination from auxiliary materials such as teeming powder and sand is unrelated to the oxygen content. So a steel with a very low total oxygen content may still contain significant amounts of harmful inclusions.
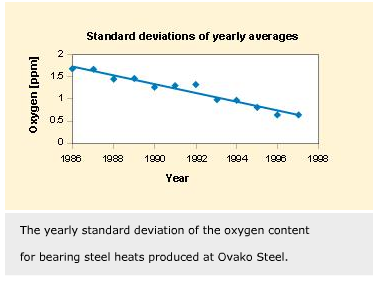
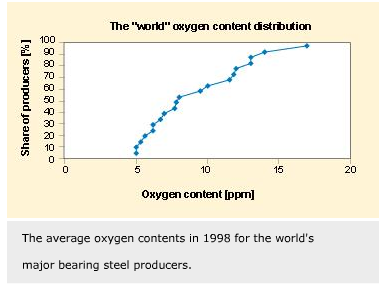
Within Ovako Steel, steady progress has been made on reducing the average oxygen content. Also the heat-to-heat variation between production runs has been reduced significantly over the past decade or so.
The quality improvements achieved have made it possible for Ovako Steel to reduce further the maximum allowable oxygen content. Today the maximum oxygen content for standard bearing steel is as low as 7 ppm.
Assessing inclusions
Given the importance of inclusion content in relation to bearing fatigue performance, emphasis has been placed on developing reliable methods of inclusion assessment.
Several standard laboratory methods exist for the assessment of large or macro inclusions. Two commonly used methods are “step-down” tests and “blue-fracture” tests. In step-down tests, bars are fine-turned in distinct steps, and defects greater than 0.5 mm are recorded. The results are then normalized per unit area of tested surface.
Blue-fracture tests also record defects larger than 0.5 mm on a bar cross-section area that has been hardened, fractured and then tempered blue to increase the visibility of defects. Less frequently used methods include magnetic particle testing and ultrasonic tests.
In the step-down and blue-fracture tests on bearing steels carried out at Ovako Steel over the past decade, all results obtained have shown zero defects. While the strict definition of “zero defects” is not likely to be valid for any type of steel, other test methods are necessary to keep pace with production methods. By the end of the 1990s new standardized techniques for assessing and quantifying large inclusions in bearing steel products are being developed.
At Ovako Steel ultrasonic scanning is used. This is based on the ASTM 588 standard. Billet samples are milled plane parallel and scanned with a 10 MHz probe. With this technique it is feasible to distinguish and quantify porosity and segregation as well as the number and size of the inclusions.
To obtain a comparative number, inclusions are classified into three size groups. Weight factors are applied to each group and the result is normalized to l0 kg of tested steel, in accordance with the ASTM 588 standard procedure.
It became evident early on that the degree of metalworking carried out on the billet sample has a significant effect on the results obtained. This has to be considered when specifications setting tolerance limits are to be made. It must be realized that above a certain degree of reduction (for a given test frequency), zero results will be obtained.
The ultrasonic technique not only has the ability to detect and quantify the content of non-metallic inclusions, but it can also detect and quantify porosity. It can give an accurate description of the segregation level in any given sample. Ultrasonic scanning can ensure that the content of large inclusions is monitored and that this information is fed back to development activities at the steel-making plant.
Micro inclusions
For smaller defects, the worldwide standard for rating micro inclusion is the ASTM (American Society for Testing Materials) standard test method for determining the inclusion content of steel (E 45), with the sampling and evaluation rules of ASTM standard specification for high-carbon anti-friction bearing steel (A 295). The latter is based on the Jernkontoret inclusion-rating scale developed at Ovako Steel in the 1940s. Even with the recent upgrade of E 45, the rating results for today’s very clean steels are becoming meaningless. For oxide inclusions, the vast majority of the bearing steel heats produced at Ovako today rate zero and so provide no meaningful development information.
Attempts have been made at improving the precision of microscopic inclusion ratings. One significant contribution is the expansion of the old Jernkontoret scale, Steel – Evaluation on non-metallic inclusions – microscopic methods – Jernkontoret plate II for quantitative assessment (SS111116), which has been standardized in Sweden. This method provides meaningful correlation to chemical composition results.
Even if the correlation is strong, however, it becomes evident that the rating values are approaching zero for the cleanliness levels typical of today’s ladle-treated steels for producers with a high-quality profile. This means that even semi-quantitative microscopic rating methods do not provide the required resolution to help improve further clean-steel quality.
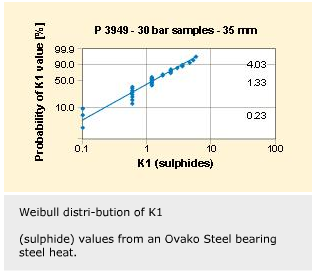
New data evaluation techniques can also be used to enhance the precision and statistical value of inclusion rating methods. The German standard DIN 60502 can be used to establish a single number (a “K” value) representing the contents of oxides and sulphides in a steel sample. This is done by rating the inclusions found in the sample against a standard chart, summing the number of inclusions per type and size, and then computing a weighted value normalized to 1000 mm2 area. The result is a K(O) value representing the oxide content and a K(S) value representing the sulphide content.
In analyzing large numbers of K-rated samples, it became evident that samples taken from the same heat of steel follow the same type of statistical distribution as the lives of rolling bearing components. Using a Weibull evaluation of inclusion distributions opens new possibilities to statistically compare the cleanliness level of different materials and also increases the possibility of relating inclusion content to bearing life.
Increasing the testing frequency can significantly enhance the resolution power of the ultrasonic scanning technique. Resolution is increased significantly at 50 MHz, and inclusions bordering on the size range normally detected in conventional E45 ratings can be detected. The examined volume, however, becomes much smaller, which means that larger inclusions may go undetected.
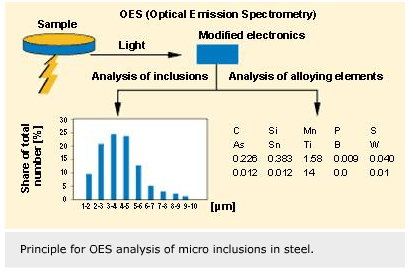
In recent times, a further exciting step has been made in the attempt to bring inclusion engineering to the steel-making process. Developments in the Optical Emission Spectrometry (OES) signal processing of the conventional chemical composition determination can be used to effectively analyze the content, size distribution and composition of non-metallic inclusions.
By adopting special signal interpreting routines, the size distribution of different oxide inclusion compositions can be derived, and this can be done separately for different inclusion composition groups.
Internal cleanliness and properties
All particles present in steel products are potential failure nuclei in any component exposed to stresses. In particular, alternating stresses generate a situation where fatigue failures initiate from defects present in the stressed zones.
A number of factors affect the fatigue-initiating propensity of defects in steel. It is evident that large defects, as one detected in ultrasonic scanning in the 10 MHz range, are of a magnitude where immediate initiation occurs. The inclusion sizes detected by the high-frequency ultrasonic scanning techniques are close to the size range where practical initiation occurs, while the OES technology attacks the size range of inclusion, which is a determinant for the success of the deoxidation process.
The situation becomes complicated because several factors seem to influence the fatigue-initiating power of different inclusion types. Attempts have been made to understand the relative importance of different inclusion parameters on fatigue initiation.
Fatigue testing
In efforts to improve fatigue properties, the main target has been to reduce oxygen content and, consequently, the presence of oxide inclusions that could initiate a fatigue crack. It is not only the amount of oxides present but their size distribution and chemical composition that influence fatigue properties. It is well known that smaller inclusions are beneficial to fatigue properties, although investigations also reveal that different types of oxide inclusions may affect the fatigue-initiation mechanisms differently.
When the amount of oxide inclusions is decreased, other defects in the structure may act as fatigue-initiation sites. When the oxygen content goes below 6 ppm, titanium carbonitrides begin to cause fatigue failures. This happens even if the titanium content is as low as 10 ppm. Due to their morphology, titanium carbonitrides are more hazardous than oxides. A titanium carbonitride could, therefore, be much smaller than an oxide in size and yet cause a fatigue failure at a certain stress level. Finally, one fatigue initiation source may be carbide clusters. This has been found in heavily segregated bearing material leading to very poor fatigue properties.
Fatigue testing procedures
Rotating beam fatigue specimens were machined from the half-radius position in soft annealed SAE 52100 bars ranging from 3 to 4 inches in diameter. The heat treatment and surface preparation involved: austenitization at 1,580 °F for 20 minutes; oil quench, tempering at 320 °F for one hour; grinding; and shot peening. The heat treatment produced a martensitic structure with a hardness of 62 HRC to 63 HRC. The shot peening was carried out to suppress surface initiation due to surface flaws.
Rotating beam fatigue testing was carried out at ambient temperature in the laboratory in an Amsler UBM 200 machine. Tests on specimens that survived more than 107 cycles were suspended. All fatigue fractures were studied in a scanning electron microscope, and the initiation sites were identified, measured and analyzed.
Different oxide types
Two heats produced by the electric arc furnace route were fatigue tested at a single stress level of 950 MPa. Aluminum deoxidation, alloying and degassing were carried out in the Asea-SKF ladle furnace. The steel was uphill teemed to ingots. In this case, the majority of the fatigue failures (85 %) were caused by oxide inclusions, with the remainder from titanium carbonitrides. Surprisingly, the heat with the lower oxygen content had the lower fatigue life, although the average oxide contents were similar.
There must be another reason for the difference in fatigue life than the amount and size of oxides. The fracture surfaces also showed different oxide configurations. The oxide inclusions in both heats consisted predominantly of Al, Ca and Mg. In most cases, Mn and S were also present. It was not possible to quantify the chemical composition of the oxides in detail.
However, during the examination it was noticed that some of the oxide inclusions were cracked, leaving half of the inclusion on each fracture surface, whereas others were solid and the inclusion remained on one of the fracture surfaces. The majority of inclusions (67 %) found on the fracture surfaces in the heat with lower fatigue life were of the cracked type, while the other heat has 25 % of this type.
Theoretical calculations on the two oxide configurations were made using a finite element routine. This confirmed the observed result that a cracked oxide is more hazardous than a solid one.
Oxides versus titanium carbonitrides
Two heats (designated G1578 & G1581) produced the same day by the standard route were fatigue tested at a single stress level of 950 MPa. Aluminum deoxidation, alloying and degassing were carried out in an Asea-SKF ladle furnace. The steel was uphill teemed to ingots (table 1).
Approximately 85 % of the fatigue failures in heat G1578 were caused by oxide inclusions, compared with only 10 % in heat G1581. In both cases, the remaining failures were caused by titanium carbonitrides. The fatigue life expressed as L50 values were 6.4 and 4.0 for heats G1578 and G1581, respectively.
No significant difference between the composition of the heats was expected. However, due to different steel processing parameters, an increase in the amount of titanium carbonitride stringers in heat G1581 decreased the fatigue life and switched the main initiation cause from oxides to carbonitrides. The size of the titanium carbonitrides is much smaller, compared with oxides. This indicates that for the same size, titanium carbonitrides are more hazardous compared with oxides.
A theoretical calculation was made on these inclusion configurations. Again, the observed result was confirmed. The morphology of the inclusions was the reason why titanium carbonitrides are more hazardous. Effects of thermal shrinkage and Young’s Modulus differences were minor.
Carbide clusters
A sample of material, vacuum arc remelted, was fatigue tested at a single stress level of 950 MPa. Most fatigue failures in this material (90 %) were caused by carbides. The remaining failures were caused by titanium carbonitrides. The conclusion in this was that the carbides – or perhaps the carbide clusters in the structure – had initiated the fatigue failures. The microstructure also showed heavily segregated areas with carbide clusters having an individual size larger than 20 µm. The fatigue life expressed as an L50 value was only 0.02 million cycles.
Conclusions
As steel-making quality improves, it must be matched by better methods to measure the content of internal defects. Today’s ladle-furnace technology has reached a stage where it meets and, in some respects, surpasses remelting technology as regards internal cleanliness.
New methods to assess the non-metallic inclusion content have been developed. By combining direct inclusion analysis based on OES technology with high-frequency, high-precision ultrasonic techniques, the inclusion size distribution and inclusion composition can be actively steered online.
This information, coupled with fatigue testing, indicates the relative importance of different types of inclusion for initiating fatigue cracks.
Thore Lund and Patrik Ölund
Ovako Steel AB, Hofors, Sweden


