New methods to predict dimensional stability
The three steps:
The effects of heat treatment on a bearing can now be predicted accurately for years to come, thanks to a technique that takes a new look at the use of established instrumentation.More accurate methods of predicting dimensional stability over the long term provide the key to developing material/heat treatment combinations that can guarantee reliable bearing operation under given operating conditions.
The hardened components of a rolling bearing are not, strictly speaking, dimensionally stable. This means that the measurements of rings and rolling elements will change over time. Normally, this has no effect whatsoever on performance throughout the bearing’s service life because the changes are very slight and occur gradually. They have also been taken into account when designing the bearing and in the recommendations made for fitting it.
With the help of a new modelling technique, SKF has created a tool that can accurately predict how a particular material will behave dimensionally at known temperatures and time periods, following a particular type of heat treatment. More significant, perhaps, is the fact that it is possible to begin to “design” materials and their heat treatment to give maximum dimensional stability to bearings for specific applications.
Dimensional stability is an important parameter because any marked dimensional change will affect bearing performance. If, for example, the inner ring “grows”, it will result in a loss of clearance in the bearing and will eventually loosen its fit on the shaft.
One problem in predicting dimensional stability is that the situation related to materials and heat treatments is complex. Each combination of material (today around 10 different steel variants are used) and heat treatment (where there are also several variants) provides a unique situation when it comes to dimensional stability.
Now it is possible to predict dimensional stability accurately by carrying out a number of tests in a dilatometer to create reference information.
Dilatometer
Essentially designed to measure expansion, the dilatometer in this case is a well-controlled furnace where the test temperature and resultant change in length can be registered. The finesse comes in measuring the length change in the sample at the same time as the temperature so that the sample’s length change curve will directly indicate whether a phase change has taken place in the material, and at what temperature. The phase transformations detected are those that involve a change in the test sample’s length. If a phase transformation occurs to a more tightly or loosely packed phase structure, this will be reflected in the dilatometer sample’s length change curve as either a reduction or an increase in length.
The standard dilatometer test sample is 8 mm long and 3 mm in diameter. The temperature and sample-length measurements are controlled by computer, and during operation the sample is exposed to an under-pressure (10-4 Torr) to minimise decarburisation.
The operating range of the dilatometer used is from room temperature up to 1300 °C with the potential to induction heat and gas cool samples at up to 800 °C/s. As most phase transformations give rise to extremely small changes in length, it is possible to magnify these changes by up to 100,000 times.
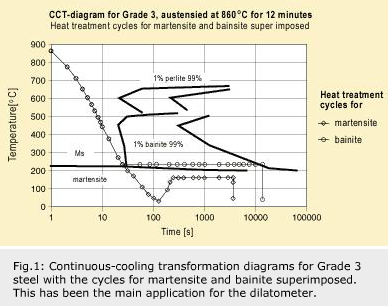
Traditionally, a dilatometer has been used to determine the specific temperature at which martensite formation (Ms) starts during rapid cooling from the austenite phase, or the time taken for bainite transformation at different holding temperatures. Another standard application has been to produce CCT (continuous cooling transformation) diagrams. To establish a CCT diagram for a steel requires a series of quenching tests from the austenitising temperature in the dilatometer, which can simulate everything from rapid cooling (hardening in oil) to slow cooling in air, and the registration of the temperatures at which phase transformations occur.
Generally speaking, the dilatometer has been undervalued and locked mainly to CCT applications and the determination of Ms. If, instead, the dilatometer is regarded as a heat treatment simulator, new applications are opened up. In principle, it is possible to repeatedly simulate all kinds of heat treatment. This means that there is no need to make hundreds of tests to obtain statistics. The dilatometer can be regarded as a precise instrument, like a surgeon’s scalpel, for a metallurgist to study dimensional changes and phase transformations resulting from heat treatment.
In this study, the dilatometer has been used to investigate an established but not well-documented area – the modelling and prediction of dimensional changes during the tempering of hardened bearing rings.
What happens?
The structure of an oil-hardened Grade 3 bearing ring consists of around 80 % of hard, brittle martensite, which is an unstable phase, 15 % of unchanged austenite – usually known as retained austenite – and about 5 % residual carbides which are not dissolved during austenite formation.
The object of tempering bearing rings is to make them dimensionally stable and tougher. What happens, however, to the ring in the tempering furnace? To answer that question requires knowledge about the phase transformations that occur. Historically it has been determined that tempering takes place in three consecutive, partly overlapping steps. It is worth adding that before tempering begins, carbon diffusion to the grain boundaries takes place. This gives rise to a shrinkage of 0.02 %.
The three steps:
- The martensite begins to decompose at 150 °C and epsilon carbide precipitates out. This phase change means that the ring shrinks by about 0.07 % and becomes somewhat less brittle and less hard. The majority of SKF martensitically hardened rings are tempered at 150 °C.
- The retained austenite begins to decompose into ferrite and cementite at around 200 °C. This phase transformation causes ring growth of the order of 0.08 %. Some SKF rings are tempered in this temperature region to be tougher and more dimensionally stable, particularly when operated under arduous conditions.
- Above 250 °C the epsilon carbide phase formed in the first step begins to transform and cementite starts to precipitate. The resultant shrinkage is 0.15 % and there is a significant reduction in hardness. Only a few rings are tempered this way.
The tempering steps have been known for more than 10 years, but the ability to model dimensional changes creates new opportunities. Previously it took years of testing to discover the temperature at which tempering should take place in order to ensure dimensional stability and maintain acceptable hardness.
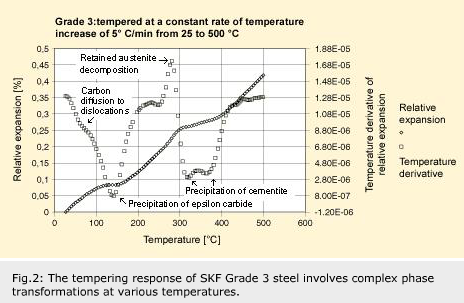
What do the tempering steps look like in the dilatometer? The sample has been hardened and then tempered for 95 minutes with a continuous temperature increase of 5 °C/min from room temperature to 500 °C. This is mainly to speed up tempering step 3, which would otherwise take decades to complete if, for example, it had been decided to use a constant holding temperature of 200 °C. The relative expansion (length change) is somewhat difficult to interpret because both thermal expansion and phase transformations contribute.
If the relative expansion is derived with respect to temperature, the phase transformations can be more clearly seen – as “peaks” and “valleys,” indicating growth and shrinkage, respectively. Phase changes occur at 140, 280, 320 and 370 °C and correspond to different tempering steps: The first is epsilon carbide formation, the second retained austenite decomposition and the third and fourth cementite precipitation.
Predicting changes
How should these phase transformations and the attendant dimensional changes be modelled for rings being tempered? It has been shown by full-scale ring tests that the dilatometer samples have the same properties as the rings, i.e. hardness, retained austenite content and dimensional stability.
This means that if the dilatometer samples can be modelled, so can the rings. The solution to the problem is to formulate a general model for the dimensional changes during tempering, carry out some 10 hour-long dilatometer runs and then optimise the model to match the dilatometer results. Dilatometer data are better than ring data because the tests are quicker and more flexible, the temperature is well defined throughout the tests, the data are accurate and, not least, because ring tests require production to be stopped – a costly procedure.
Then a mathematical description of how a phase transformation progresses with time and temperature during tempering is adopted to formulate the model. Johnson-Mehl-Avrami (JMA) developed the following formula [1] to describe the proportion of the phase f(T(t)) which has been transformed as a result of the heat treatment, ß(T(t)). The proportion is zero before transformation starts and gradually tends to one (transformation complete) with increasing temperature and time.

The proportion of the phase that is transformed is governed by the time and temperature-dependent variable ß(T(t)) which can be calculated using formula [2]. R [J·mol-1K-1] is the general gas constant.

Three optimisation constants have been introduced into the JMA kinetics: E [J·mol-1] is the activation energy threshold that must be exceeded if transformation is to start; k0 [s-1] is the frequency or the speed at which the transformation occurs; and the Avrami exponent n shows where the phase change occurs – in the matrix or at the grain boundaries, for example.
Having formulated the model, it is optimised against 10 hour-long dilatometer tests using a computer. It is then possible to predict dimensional changes during any tempering procedure. The only input data required are the retained austenite content and the temperature as a function of the tempering duration. The output is the dimensional change during the chosen tempering process.
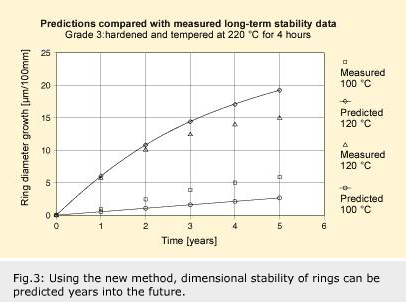
To test the predictive ability of the model, it was then compared with long-term dimensional stability data obtained by the then SKF Central Laboratory in Göteborg during the 1950s and 1960s. The data are for ring diameter growth; in it has been normalised to the diameter increase in micrometres for a ring diameter of 100 mm. The ring data agree well with the model’s predictions.
The conclusion is that the model, based on some hours of tests and months of development, is able to predict dimensional change years ahead and can thus replace some five years of experiments.
Conclusion
The dilatometer is a powerful tool when trying to understand what is happening in the steel during heat treatment and to facilitate modelling of the heat treatment response. In addition, it provides an unparalleled understanding of what happens in the steel as a result of the heat treatment so the furnace is no longer a “black box” that impedes production.
Modelling and predicting ring growth are easy with the help of a dilatometer and avoid long and costly full-scale trials with rings. As the dilatometer samples and rings have the same characteristics, heat treatment recommendations can be made quickly, taking into account hardness and stability at various operating temperatures. The need for expensive fullscale trials is minimised.
Staffan Larsson
and Thore Lund
Ovako Steel, Hofors, Sweden


