Non-destructive testing at SKF
To assure high quality levels in line with company specifications, SKF employs a number of non-destructive testing methods.
Summary
Today, modern non-destructive testing is performed at SKF in manufacturing, remanufacturing and in-service inspections to ensure product integrity and reliability, to control manufacturing processes and lower production costs, and to maintain a uniform quality level in line with SKF specifications.
Quality Technology is a centralized group within SKF Group Technology Development that focuses on standardization and development of all quality inspections in SKF factories. One important area where this group is striving for standardization in SKF manufacturing is the field of non-destructive testing (NDT).
NDT technologies
Non-destructive testing can be defined as the process of inspecting, testing or evaluating materials, components or assemblies for discontinuities or differences in material characteristics without influencing the serviceability of the component. In other words, when the inspection or test is completed the component can still be used.
NDT methods may rely upon the use of physical phenomena such as electromagnetic radiation, sound propagation and inherent properties of materials to examine solid samples such as bearing components. Many different NDT methods exist. The most common methods are:
- ultrasonic testing
- electromagnetic testing (eddy current testing)
- magnetic particle testing
- radiographic testing
- liquid penetrant testing
- visual testing
- acoustic emission testing
- thermal/infrared testing.
Of these methods, ultrasonic testing and eddy current testing are two of the most-often-used techniques in bearing manufacturing. A more detailed description of these methods follows.
Ultrasonic testing
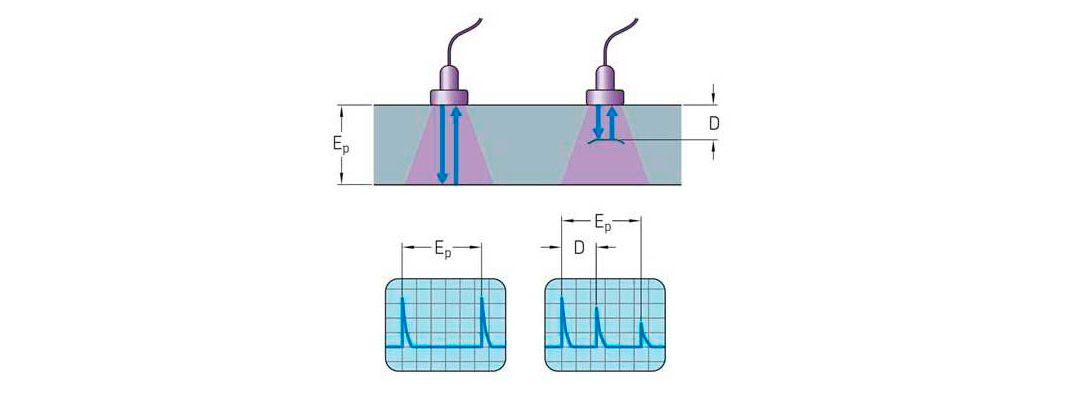
Ultrasonic testing (UT) is a series of non-destructive testing techniques based on the propagation of ultrasonic waves in the object or material tested. In most common UT applications, very short ultrasonic pulse waves with centre frequencies ranging from 0.1 to 20 MHz are transmitted into materials to detect internal flaws or to characterize materials.
In practice, ultrasonic sound energy is introduced into the component to be tested by bringing it in contact with a transducer connected to a diagnostic instrument. The key element of this transducer is piezo crystals that transform electric energy into mechanical energy in the form of sound pulses that are introduced into the material [1].
These pulses are reflected at discontinuities in the material such as inclusions and porosity formed during steelmaking (fig. 1).
Fig. 2 shows the basic parts of the transducer as well as the resulting sound field, here represented by the sound pressure field for waves propagating in water.
Eddy current testing
Eddy current testing (ET) is one of many electromagnetic testing methods used in NDT, making use of electromagnetic induction to detect and characterize surface and subsurface flaws in conductive materials such as steel and aluminium.
The principles of ET [2] are shown in fig. 3. Eddy currents are created through a process called electromagnetic induction. When an alternating current is applied to the conductor, such as copper wire, a magnetic field develops in and around the conductor (a). This magnetic field expands as the alternating current rises to maximum and collapses as the current is reduced to zero. If another electrical conductor is brought into close proximity to this changing magnetic field, current is induced in this second conductor. Eddy currents are induced electrical currents that flow in a circular path (b).
Variations in the electrical conductivity and magnetic permeability of the test object and the presence of defects cause a change in the eddy current and a corresponding change in phase and amplitude that can be detected by an instrument connected to the probe (c).
At various stages of SKF manufacturing processes, ET techniques are applied to semi-finished and finished bearing components to characterize material properties and to detect near-surface defects such as cracks and thermal damage caused during hard machining operations.
NDT in SKF manufacturing
SKF efforts in assuring quality begin with the raw material. SKF works in cooperation with its suppliers to ensure that all purchased raw materials meet SKF requirements. Automated, 100% in-line NDT is an important part of these requirements.
The vast majority of NDT inspections at SKF are performed throughout the manufacturing process. SKF follows all relevant industrial norms prescribed in industries where SKF bearings are used, such as the aerospace and railway industries. Fig. 4 shows a machine for 100% in-line testing of railway wheel and axle box bearings.
Driven by customer needs for increased reliability, NDT is being increasingly requested by other industries such as automotive and renewable energy.
SKF has its own criteria for bearings used in wind turbines.
Remanufacturing and advanced field return investigation
Bearings that have been in service or endurance-tested in a test rig may be examined by various NDT methods. This is to provide more insight into the root cause of bearing failure and bearing degradation mechanisms or, in the case of bearing remanufacturing inspection, to check for subsurface damage and see if the bearing component is fit for further service.
At SKF, ultrasonic testing is used to detect subsurface fatigue cracks as part of such failure investigations. Fig. 5 (left) shows an ultrasonic C-scan image representing reflected ultrasonic energy from subsurface cracks around the circumference of a bearing raceway. After sectioning and microscope examination, ultrasonic signals can be correlated to the actual subsurface damage found as shown in fig. 5 (right).
Automated versus manual NDT
SKF is striving for a high degree of automation of NDT in the manufacturing processes. The main reason for this is an increased capability to reliably fulfil the assigned task of the inspection. It is has been shown in several studies that even with accurately described procedures and skilled operators, all manual inspections suffer from lower capability due to human factors [3, 4, 5].
All NDT methods are statistical in nature, and their ability to detect defects must be described probabilistically. Consequently, there are no certainties in NDT, only probabilities. In addition to the probability of detecting an existing defect, the probability of generating indications where there are no defects (i.e., false reject) and the probability of not detecting an existing defect (i.e., false accept) must be considered [6].
The reliability of an NDT method can be expressed as a quantitative statistical measure of the ability, under given circumstances, to detect defects of a specific size in a defined part. Reliability of the NDT method depends on a number of factors, including manual versus automatic testing, equipment capability and operator skills. The reliability of an NDT process in manufacturing can be expressed using a so-called probability of detection curve (POD). Fig. 6 shows the principles of such a POD curve. Fig. 7 shows SKF’s goal to improve POD and the reliability of NDT techniques by striving for automatic inspection, trained and skilled operators, well-described procedures and capable equipment.
Digitalization
Digitalization is the process of making digital everything that can be digitized and the process of converting information into a digital format. In SKF manufacturing processes, digitalization is part of the transformation of industry, referred to as Industry 4.0. This transformation is also supported by digitalization of inspection data from non-destructive tests performed throughout the manufacturing process.
Traditionally, NDE (non-destructive evaluation) data is often discarded the moment the test is done, eliminating the ability to learn how a part evolves over time. Even when data is saved, it often lacks interconnectivity, limiting how it can be integrated into a holistic representation of the part [7] and how purposeful actions can be taken in a manufacturing process based on the knowledge from this data. Digital and interconnected inspection data will open up new opportunities for bearing manufacturing, for instance, by enabling fast feedback and control of manufacturing processes.
Modelling
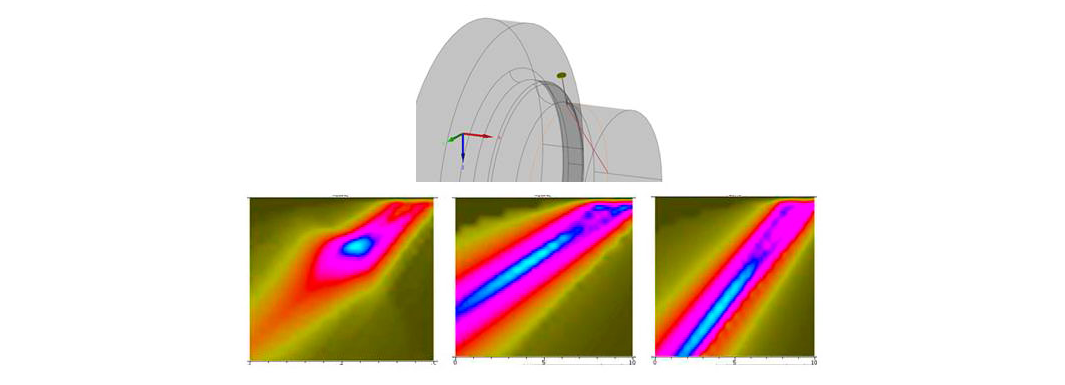
To speed up developments and reduce resource- and time-consuming physical testing, SKF is focusing on the use of analytical tools and simulations dedicated to NDT. Fig. 8 shows an example of results from sound field pressure modelling in a bearing ring.
SKF collaboration with world-class external partners
To ensure access to the latest developments in the field of NDT, SKF continuously evaluates opportunities for collaboration with the best universities, institutes and suppliers.
One of these initiatives that SKF sponsors is RCNDE [8] – Research Consortium in Non-Destructive Evaluation. This consortium is a successful collaboration between industry and academia, co-funded by the UK Engineering and Physical Sciences Research Council (EPSRC). Members of this consortium are international industrial companies representing oil and gas, aerospace, nuclear and manufacturing sectors and UK-based universities including the University of Manchester, Imperial College of London, the University of Nottingham, the University of Warwick, the University of Strathclyde and the University of Bristol. These universities are conducting core research to address common general challenges in industry as well as targeted research projects that are addressing specific SKF challenges.
SKF has also recently signed a membership agreement with ARTC – the Advanced Remanufacturing and Technology Centre, Singapore [9]. This centre supports SKF with developments in manufacturing and remanufacturing technologies at technology readiness levels between 4 and 6, i.e., demonstrating new technologies in a relevant environment. Development of non-destructive technologies for product verification of remanufactured components and manufacturing inspection is a core strength of this centre.
SKF is also a member of Jernkontoret, the branch organization of the Swedish steel industry [10]. One of the research committees of Jernkontoret focuses on NDT. The role of this committee is to initiate and steer non-destructive testing research projects funded by Swedish government agencies that are conducted at Swedish universities and institutes.


